Concept Art Pipeline: From Brief to Final Asset
Step-by-step breakdown of the concept art pipeline - how studios take characters and environments from brief through thumbnails to approved final art.
Concept art is the foundation of game production. It establishes the visual identity that every subsequent piece of art must align with - character models, environments, UI, marketing materials. Getting the concept pipeline right sets the quality ceiling for everything downstream.
This guide explains how a professional concept art pipeline works, from initial brief to approved final art - including where the process usually breaks down and how to avoid it.
What Concept Art Actually Does
Concept art serves two distinct functions that are often conflated:
Design exploration - generating and evaluating ideas before committing to a visual direction. This phase is deliberately iterative and experimental. Multiple concepts are produced, compared, and narrowed down.
Production reference - creating final approved art that serves as the authoritative visual standard for production. This phase is precise and detailed. The goal is an image that communicates the design to every person who will use it as reference.
Understanding which function you need at any given stage prevents a common mistake: asking for production-grade concept art before the design direction is approved, or treating exploratory sketches as production reference.
Stage 1: The Brief
A concept art brief is more open-ended than a production brief for finished assets. You’re asking an artist to solve a design problem, not execute an already-solved one.
A strong concept art brief includes:
Character/subject parameters
- Role in the game (hero, villain, merchant, enemy type)
- Personality and tone (fierce, playful, melancholic, intimidating)
- Cultural or historical references if relevant
- Physical characteristics that are fixed vs. open to interpretation
World context
- Setting and time period
- Faction or group the subject belongs to
- Technology level and material culture
- How this subject relates to others you’ve already defined
Style constraints
- Visual style parameters (stylization level, art direction references)
- Silhouette requirements (readability, distinctiveness)
- Color constraints (if palette is already established)
Deliverable requirements
- How many concept variants to generate
- Level of finish expected (rough sketches vs. finished illustration)
- View angles needed (front, 3/4, profile, back)
What to leave open For the exploration phase, leave design decisions open - that’s what you’re paying the concept artist to explore. Overconstrained briefs produce timid, undifferentiated concepts.
Stage 2: Thumbnails and Rough Explorations
The first deliverable from a concept artist is usually a set of thumbnails - small, rough sketches that explore different interpretations of the brief.
Thumbnails are typically:
- Small (business card to postcard size)
- Loose - no detail, just silhouette and general form
- Multiple per brief (4–12 is common for a character)
- Fast - a professional concept artist can produce 6–10 thumbnails in a day
The purpose of this stage is cheap exploration. You’re looking for the strongest design direction, not a polished illustration.
How to review thumbnails: Focus on silhouette, proportion, and feeling - not detail. Ask: “Does this read as the character we need? Does the silhouette communicate the right personality and role?” A strong thumbnail that lacks detail is more valuable than a polished rendering of a weak design.
Select 1–3 thumbnails to develop further. Be specific about what you want developed and what should change.
Stage 3: Design Development
Selected thumbnails are developed into more resolved sketches. This stage adds volume, detail, and clarity to the chosen direction.
Development sketches typically:
- Show the main view at larger scale
- Resolve major structural decisions (costume details, proportions, materials)
- May include detail callouts for specific elements
- Still in line art - color is usually not introduced yet
This is the primary design review stage. Catching problems here is far cheaper than catching them after final rendering.
What to look for in development:
- Does the character read as the right personality/role?
- Are proportions consistent with your other characters?
- Are there elements that will be technically difficult to model or animate?
- Does the design serve gameplay requirements? (If a character is an enemy that players need to read quickly, is the silhouette clear?)
- Are there IP or likeness concerns in the design?
Provide specific written notes plus marked-up annotations on the actual sketch. Approve to proceed to color, or request specific revisions.
Stage 4: Color and Material Exploration
Once the line art design is approved, color is introduced. This is typically done as separate exploration from line refinement - a “flat color pass” that establishes the color palette before lighting and rendering.
Color explorations often include:
- Multiple color variant options (2–4 is common)
- Flat fill without shading - showing base colors only
- Material indication (what’s metal, fabric, skin, leather, etc.)
This stage answers: “Does this color combination work for this character?” It doesn’t yet answer “how will this look in your specific engine lighting.”
How to review color explorations: Consider the character alongside your existing cast. Does this color palette help or hurt readability? Does it conflict with other characters they’ll appear alongside? Does it fit your world’s visual language?
Select and approve one color direction.
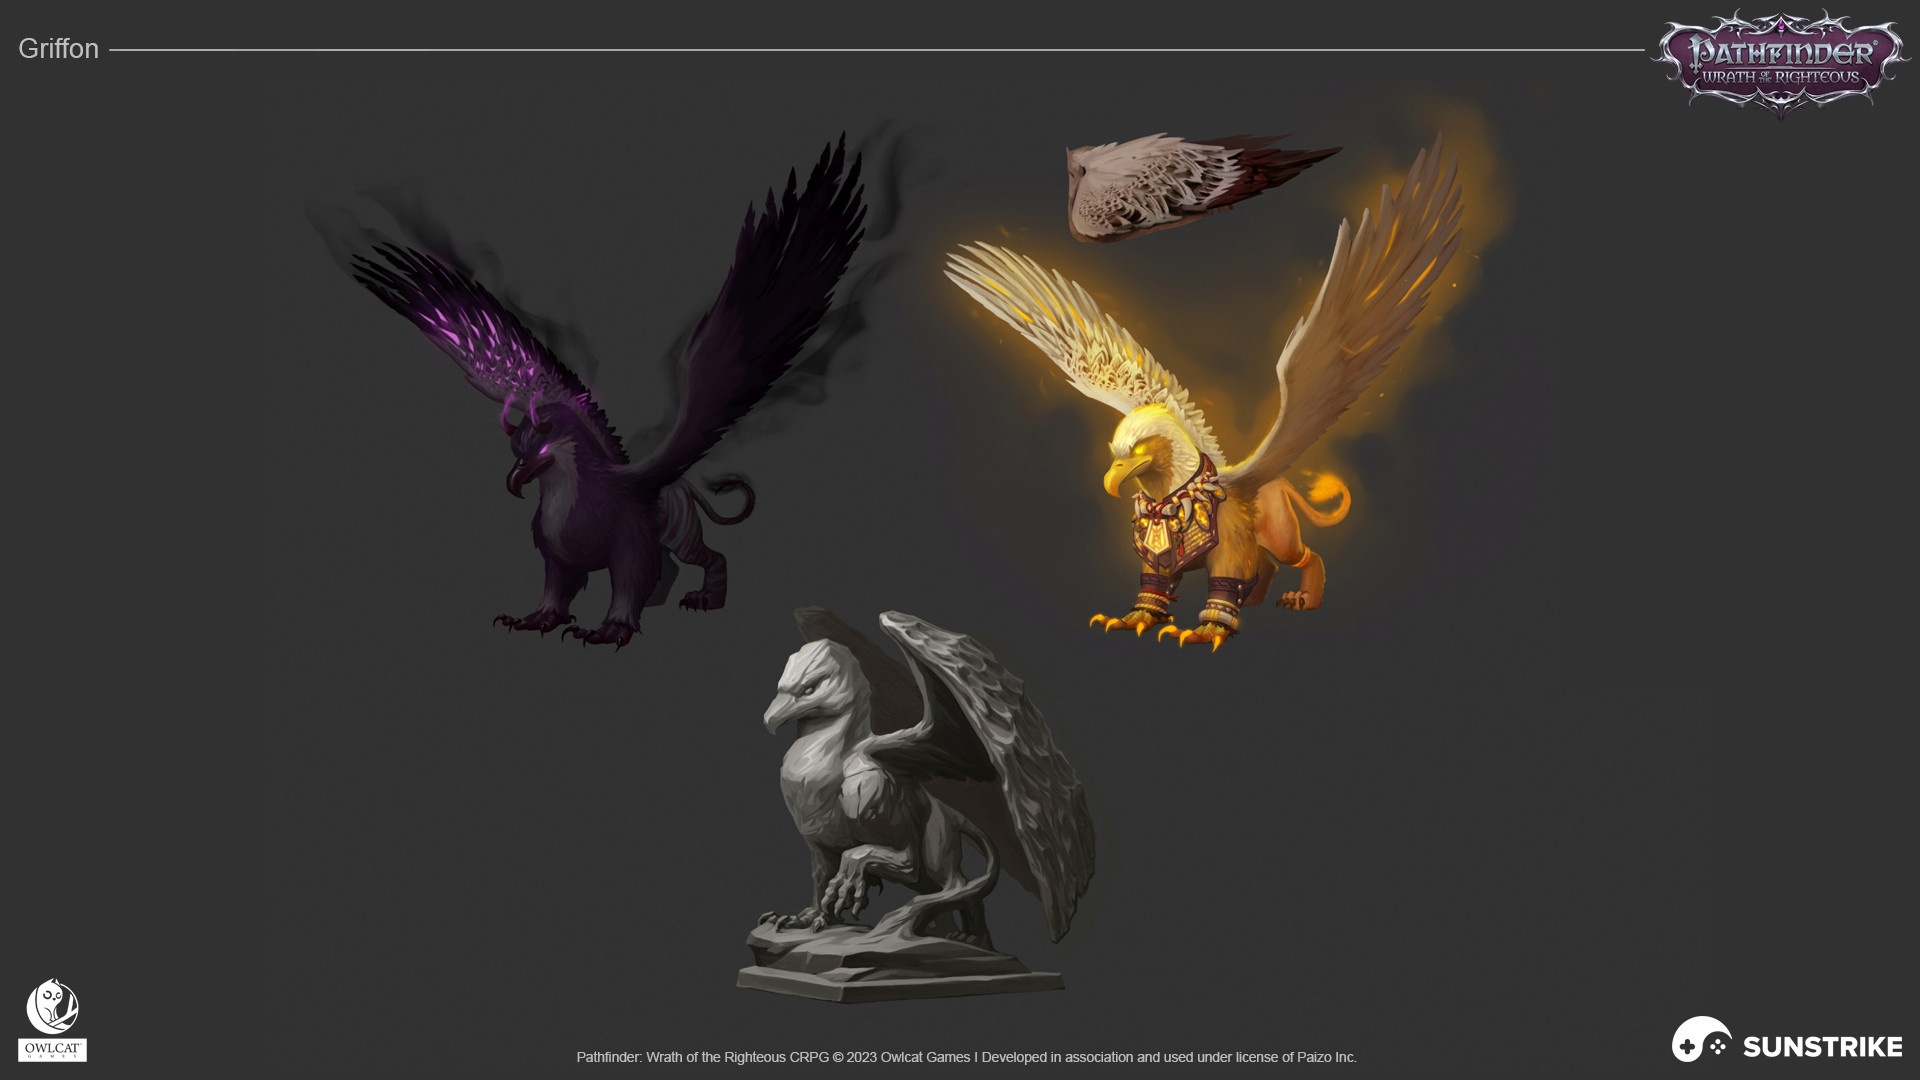
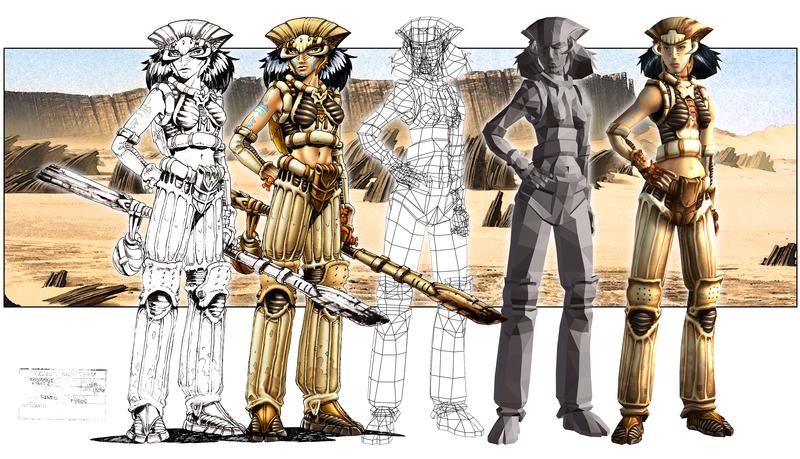
Stage 5: Final Concept Rendering
With design and color approved, the concept artist produces a fully rendered final piece. This is the polished, finished illustration that will serve as production reference.
A complete final concept typically includes:
- Primary view (front or 3/4) fully rendered
- Turnaround views if needed (front, back, side) - important for 3D production
- Detail sheets for complex elements (face, hands, props, accessories)
- Material callouts (often annotations indicating surface properties)
- Color palette swatches
The final concept should communicate enough information that a 3D artist or 2D animator can produce accurate work without needing to ask basic design questions.
Stage 6: Approval and Production Handoff
Final concept approval is a formal milestone. Once approved:
- The concept is locked - no further design changes without a change order
- The file is distributed to all production teams who need it as reference
- It’s archived as an approved master in your style library
The handoff package should include:
- High-resolution final illustration
- Any accompanying detail sheets and callouts
- Color palette file (for consistency)
- Brief notes for production team members who weren’t in the review process
When Concept Art Goes Wrong
Unclear brief leading to misaligned concepts
The most common problem. If the brief doesn’t clearly define the character’s role, personality, and constraints, concept artists fill the gaps with their own assumptions - which may not match your vision.
Fix: Front-load the brief with as much context as possible. More context, not less.
Approving development sketches that don’t solve the design problem
It’s tempting to approve work that’s technically well-executed but doesn’t actually address the design problem. A beautifully rendered character who doesn’t read as the correct role is still a design failure.
Fix: Evaluate concepts against the brief criteria, not just visual quality. Ask explicitly: “Does this solve the brief?”
Moving to final render before design is locked
Producing a polished final rendering of a design that still has unresolved issues is expensive waste. Changes at the final render stage cost 3–5× what they cost at the sketch stage.
Fix: Lock design decisions at each stage before advancing. Design → Line Art → Color → Final is a one-way gate, not a loop.
Using final concepts as production reference without distribution
Concept art that’s approved but never gets to the production teams is worthless. 3D modelers building a character from a description of the concept instead of the concept itself is how characters diverge from their intended designs.
Fix: Formalize distribution as part of the approval process. Final concept approval = distribution to production team.
Concept Art for Different Asset Types
Character Concept Pipeline
The pipeline described above applies most directly to characters. Characters typically require:
- Full-body turnaround (front, side, back)
- Expression sheet (5–10 key expressions)
- Action poses (3–6 poses showing personality in motion)
- Detail sheets (face, hands, accessories)
Environment Concept Pipeline
Environment concepts are more exploratory and less prescriptive than character concepts:
- Mood and atmosphere exploration (several loose paintings)
- Area overview (bird’s-eye or establishing view)
- Detailed focal points (hero objects, key architecture)
- Material and lighting references
Environment concepts don’t require turnarounds but do benefit from annotated breakdowns of architectural or natural elements.
Prop and Item Concept Pipeline
Props are simpler: front/side views at sufficient detail to model from, material callouts, scale reference if relevant. The concept pipeline for props is compressed - thumbnails, development, final - without the full exploration phase you’d do for a hero character.
For related guidance, see our article on how to write a game art brief and our guide to game art style consistency.
Building Concept Art Into Your Schedule
Concept art needs buffer time that production art doesn’t:
- Build in buffer for exploration iteration - not every concept direction will work
- Concept approval gates should have defined response time commitments (e.g., “we will respond within 3 business days”)
- Downstream production can’t start until concept is approved - this creates schedule risk that needs to be managed explicitly
The studios that handle concept art most successfully treat it as a distinct production phase with its own dedicated schedule - not as a fast prerequisite to “real” production.
Invest in the concept phase. Everything downstream depends on it.